To see posts by date, check out the archives
If Git had a nemesis, it’d be large files.
Large files bloat Git’s storage, slow down git clone,
and wreak havoc on Git forges.
In 2015, GitHub released Git LFS—a Git extension that hacked around problems with large files. But Git LFS added new complications and storage costs.
Meanwhile, the Git project has been quietly working on large files. And while LFS ain’t dead yet, the latest Git release shows the path towards a future where LFS is, finally, obsolete.
What you can do today: replace Git LFS with Git partial clone
Git LFS works by storing large files outside your repo.
When you clone a project via LFS, you get the repo’s history and small files, but skip large files. Instead, Git LFS downloads only the large files you need for your working copy.
In 2017, the Git project introduced partial clones that provide the same benefits as Git LFS:
Partial clone allows us to avoid downloading [large binary assets] in advance during clone and fetch operations and thereby reduce download times and disk usage.
– Partial Clone Design Notes, git-scm.com
Git’s partial clone and LFS both make for:
- Small checkouts – On clone, you get the latest copy of big files instead of every copy.
- Fast clones – Because you avoid downloading large files, each clone is fast.
- Quick setup – Unlike shallow clones, you get the entire history of the project—you can get to work right away.
What is a partial clone?
A Git partial clone is a clone with a --filter.
For example, to avoid downloading files bigger than 100KB, you’d use:
git clone --filter='blobs:size=100k' <repo>Later, Git will lazily download any files over 100KB you need for your checkout.
By default, if I git clone a repo with many revisions of
a noisome 25 MB PNG file, then cloning is slow and the checkout is
obnoxiously large:
$ time git clone https://github.com/thcipriani/noise-over-git
Cloning into '/tmp/noise-over-git'...
...
Receiving objects: 100% (153/153), 1.19 GiB

real    3m49.052s
Almost four minutes to check out a single 25MB file!
$ du --max-depth=0 --human-readable noise-over-git/.
1.3G    noise-over-git/.
$ ^ 🤬
And 50 revisions of that single 25MB file eat 1.3GB of space.
But a partial clone side-steps these problems:
$ git config --global alias.pclone 'clone --filter=blob:limit=100k'
$ time git pclone https://github.com/thcipriani/noise-over-git
Cloning into '/tmp/noise-over-git'...
...
Receiving objects: 100% (1/1), 24.03 MiB

real    0m6.132s
$ du --max-depth=0 --human-readable noise-over-git/.
49M     noise-over-git/
$ ^ 😻 (the same size as a git lfs checkout)
My filter made cloning 97% faster (3m 49s → 6s), and it reduced my checkout size by 96% (1.3GB → 49M)!
But there are still some caveats here.
If you run a command that needs data you filtered out, Git will need
to make a trip to the server to get it. So, commands like
git diff, git blame, and
git checkout will require a trip to your Git host to
run.
But, for large files, this is the same behavior as Git LFS.
Plus, I can’t remember the last time I ran git blame on
a PNG 🙃.
Why go to the trouble? What’s wrong with Git LFS?
Git LFS foists Git’s problems with large files onto users.
And the problems are significant:
- 🖕 High vendor lock-in – When GitHub wrote Git LFS, the other large file systems—Git Fat, Git Annex, and Git Media—were agnostic about the server-side. But GitHub locked users to their proprietary server implementation and charged folks to use it.1
- 💸 Costly – GitHub won because it let users host repositories for free. But Git LFS started as a paid product. Nowadays, there’s a free tier, but you’re dependent on the whims of GitHub to set pricing. Today, a 50GB repo on GitHub will cost $40/year for storage. In contrast, storing 50GB on Amazon’s S3 standard storage is $13/year.
- 😰 Hard to undo – Once you’ve moved to Git LFS, it’s impossible to undo the move without rewriting history.
- 🌀 Ongoing set-up costs – All your collaborators need to install Git LFS. Without Git LFS installed, your collaborators will get confusing, metadata-filled text files instead of the large files they expect.
The future: Git large object promisors
Large files create problems for Git forges, too.
GitHub and GitLab put limits on file size2 because big files cost more money to host. Git LFS keeps server-side costs low by offloading large files to CDNs.
But the Git project has a new solution.
Earlier this year, Git merged a new feature: large object promisers. Large object promisors aim to provide the same server-side benefits as LFS, minus the hassle to users.
This effort aims to especially improve things on the server side, and especially for large blobs that are already compressed in a binary format.
This effort aims to provide an alternative to Git LFS
– Large Object Promisors, git-scm.com
What is a large object promisor?
Large object promisors are special Git remotes that only house large files.
In the bright, shiny future, large object promisors will work like this:
- You push a large file to your Git host.
- In the background, your Git host offloads that large file to a large object promisor.
- When you clone, the Git host tells your Git client about the promisor.
- Your client will clone from the Git host, and automagically nab large files from the promisor remote.
But we’re still a ways off from that bright, shiny future.
Git large object promisors are still a work in progress. Pieces of large object promisors merged to Git in March of 2025. But there’s more to do and open questions yet to answer.
And so, for today, you’re stuck with Git LFS for giant files. But once large object promisors see broad adoption, maybe GitHub will let you push files bigger than 100MB.
The future of large files in Git is Git.
The Git project is thinking hard about large files, so you don’t have to.
Today, we’re stuck with Git LFS.
But soon, the only obstacle for large files in Git will be your half-remembered, ominous hunch that it’s a bad idea to stow your MP3 library in Git.
Edited by Refactoring English
Later, other Git forges made their own LFS servers. Today, you can push to multiple Git forges or use an LFS transfer agent, but all this makes set up harder for contributors. You’re pretty much locked-in unless you put in extra effort to get unlocked.↩︎
File size limits: 100MB for GitHub, 100MB for GitLab.com↩︎
People should try to compare the quality of the kernel git logs with some other projects, and cry themselves to sleep.
– Linus Torvalds
I’ll never remember your project’s commit guidelines.
Every project insists on something different:
- Conventional commits
- Problem/Solution format
- Gitmoji
- The twisty maze of trailers in the Linux Kernel
But git commit templates help. Commit templates provide a scaffold for commit messages, offering documentation where you need it: inside the editor where you’re writing your commit message.
What is a git commit template?
When you type git commit, git pops open your text
editor1. Git can pre-fill your editor with a
commit template—it’s like a form you fill out.
Creating a commit template is simple.
- Create a plaintext file – mine lives at
~/.config/git/message.txt - Tell git to use it:
git config --global \
    commit.template '~/.config/git/message.txt'
My default template packs everything I know about writing a commit.
Project-specific templates with IncludeIf
The real magic of commit templates is you can have different templates for each project.
Different projects can use different templates with git’s
includeIf configuration setting.2
Large projects, such as the Linux kernel, git, and MediaWiki, have their own commit guidelines.
For Wikimedia work, I stow git repos in
~/Projects/Wikimedia and at the bottom of my global git
config (~/.config/git/config) I have:
[includeIf "gitdir:~/Projects/Wikimedia/**"]
    path = ~/.config/git/config.wikimedia
In config.wikimedia, I point to my Wikimedia-specific
commit template. I also override other git config settings like my
user.email or core.hooksPath.
An example: my global template
My default commit template contains three sections:
- Subject – 50 characters or less, capitalized, no end punctuation.
- Body – Wrap at 72 characters with a blank line separating it from the subject.
- Trailers – Standard formats with a blank line separating them from the body.
In each section, I added pointers for both format3 and content.
For the header, the guidance is quick:
# 50ch. wide ----------------------------- SUBJECT
#                                                |
#     "If applied, this commit will..."          |
#                                                |
#     Change / Add / Fix                         |
#     Remove / Update / Document                 |
#                                                |
# ------- ↓ LEAVE BLANK LINE ↓ ---------- /SUBJECT
For the body, I remind myself to answer basic questions:
# 72ch. wide ------------------------------------------------------ BODY
#                                                                      |
#     - Why should this change be made?                                |
#       - What problem are you solving?                                |
#       - Why this solution?                                           |
#     - What's wrong with the current code?                            |
#     - Are there other ways to do it?                                 |
#     - How can the reviewer confirm it works?                         |
#                                                                      |
And that’s it, except for git trailers.
The twisty maze of git trailers
My template has a section for trailers used by the projects I work on.
#     TRAILERS                                                         |
#     --------                                                         |
#     (optional) Uncomment as needed.                                  |
#     Leave a blank line before the trailers.                          |
#                                                                      |
# Bug: #xxxx
# Acked-by: Example User <user@example.com>
# Cc: Example User <user@example.com>
# Co-Authored-by: Example User <user@example.com>
# Requested-by: Example User <user@example.com>
# Reported-by: Example User <user@example.com>
# Reviewed-by: Example User <user@example.com>
# Suggested-by: Example User <user@example.com>
# Tested-by: Example User <user@example.com>
# Thanks: Example User <user@example.com>
These trailers serve as useful breadcrumbs of documentation. Git can parse them using standard commands.
For example, if I wanted a tab-separated list of commits and their
related tasks, I could find Bug trailers using
git log:
$ TAB=%x09
$ BUG_TRAILER='%(trailers:key=Bug,valueonly=true,separator=%x2C )'
$ SHORT_HASH=%h
$ SUBJ=%s
$ FORMAT="${SHORT_HASH}${TAB}${BUG_TRAILER}${TAB}${SUBJ}"
$ git log --topo-order --no-merges \
      --format="$FORMAT"
d2b09deb12f     T359762 Rewrite Kurdish (ku) Latin to Arabic converter
28123a6a262     T332865 tests: Remove non-static fallback in HookRunnerTestBase
4e919a307a4     T328919 tests: Remove unused argument from data provider in PageUpdaterTest
bedd0f685f9             objectcache: Improve `RESTBagOStuff::handleError()`
2182a0c4490     T393219 tests: Remove two data provider in RestStructureTest
Stop remembering commit message guidelines
Git commit templates free your brain from remembering what to write, allowing you to focus on the story you need to tell.
Save your brain for what it’s good at.
[The] Linux kernel uses GPLv2, and if you distribute GPLv2 code, you have to provide a copy of the source (and modifications) once someone asks for it. And now I’m asking nicely for you to do so 🙂
– Joga, bbs.onyx-international.com

In January, I bought a Boox Go 10.3—a 10.3-inch, 300-ppi, e-ink Android tablet.
After two months, I use the Boox daily—it’s replaced my planner, notebook, countless PDF print-offs, and the good parts of my phone.
But Boox’s parent company, Onyx, is sketchy.
I’m conflicted. The Boox Go is a beautiful, capable tablet that I use every day, but I recommend avoiding as long as Onyx continues to disregard the rights of its users.
How I’m using my Boox

Each morning, I plop down in front of my MagicHold laptop stand and journal on my Boox with Obsidian.
I use Syncthing to back up my planner and sync my Zotero library between my Boox and laptop.
In the evening, I review my PDF planner and plot for tomorrow.
I use these apps:
- Obsidian – a markdown editor that syncs between all my devices with no fuss for $8/mo.
- Syncthing – I love Syncthing—it’s an encrypted, continuous file sync-er without a centralized server.
- Meditation apps1 – Guided meditation away from the blue light glow of my phone or computer is better.
Before buying the Boox, I considered a reMarkable.
The reMarkable Paper Pro has a beautiful color screen with a frontlight, a nice pen, and a “type folio,” plus it’s certified by the Calm Tech Institute.
But the reMarkable is a distraction-free e-ink tablet. Meanwhile, I need distraction-lite.
What I like
- Calm(ish) technology – The Boox is an intentional device. Browsing the internet, reading emails, and watching videos is hard, but that’s good.
- Apps – Google Play works out of the box. I can install F-Droid and change my launcher without difficulty.
- Split screen – The built-in launcher has a split screen feature. I use it to open a PDF side-by-side with a notes doc.
- Reading – The screen is a 300ppi Carta 1200, making text crisp and clear.
What I dislike

- Typing – Typing latency is noticeable.
- At Boox’s highest refresh rate, after hitting a key, text takes between 150ms to 275ms to appear.
- I can still type, though it’s distracting at times.

- Accessories
- Pen – The default pen looks like a child’s whiteboard marker and feels cheap. I replaced it with the Kindle Scribe Premium pen, and the writing experience is vastly improved.
- Cover – It’s impossible to find a nice cover. I’m using a $15 cover that I’m encasing in stickers.
- Tool switching – Swapping between apps is slow and clunky. I blame Android and the current limitations of e-ink more than Boox.
- No frontlight – The Boox’s lack of frontlight prevents me from reading more with it. I knew this when I bought my Boox, but devices with frontlights seem to make other compromises.
Onyx
The Chinese company behind Boox, Onyx International, Inc., runs the servers where the Boox routes telemetry. I block this traffic with Pi-Hole2.

I inspected this traffic via Mitm proxy—most traffic was benign, though I never opted into sending any telemetry (nor am I logged in to a Boox account). But it’s also an Android device, so it’s feeding telemetry into Google’s gaping maw, too.
Worse, Onyx is flouting the terms of the GNU Public License, declining to release Linux kernel modifications to users. This is anathema to me—GPL violations are tantamount to theft.
Onyx’s disregard for user rights makes me regret buying the Boox.
Verdict
I’ll continue to use the Boox and feel bad about it. I hope my digging in this post will help the next person.
Unfortunately, the e-ink tablet market is too niche to support the kind of solarpunk future I’d always imagined.
But there’s an opportunity for an open, Linux-based tablet to dominate e-ink. Linux is playing catch-up on phones with PostmarketOS. Meanwhile, the best e-ink tablets have to offer are old, unupdateable versions of Android, like the OS on the Boox.
In the future, I’d love to pay a license- and privacy-respecting company for beautiful, calm technology and recommend their product to everyone. But today is not the future.
I go back and forth between “Waking Up” and “Calm”↩︎
Over the past six months, I’ve tracked my money with hledger—a plain text
double-entry accounting system written in Haskell. It’s been
surprisingly painless.
My previous attempts to pick up real accounting tools floundered. Hosted tools are privacy nightmares, and my stint with GnuCash didn’t last.
But after stumbling on Dmitry Astapov’s “Full-fledged
hledger” wiki1, it
clicked—eventually consistent accounting. Instead of
modeling your money all at once, take it one hacking session at a
time.
It should be easy to work towards eventual consistency. […] I should be able to [add financial records] bit by little bit, leaving things half-done, and picking them up later with little (mental) effort.
– Dmitry Astapov, Full-Fledged Hledger
Principles of my system
I’ve cobbled together a system based on these principles:
- Avoid manual entry – Avoid typing in each transaction. Instead, rely on CSVs from the bank.
- CSVs as truth – CSVs are the only things that matter. Everything else can be blown away and rebuilt anytime.
- Embrace version control – Keep everything under version control in Git for easy comparison and safe experimentation.
Learn hledger in five minutes
hledger concepts are heady, but its use is simple. I
divide the core concepts into two categories:
- Stuff
hledgercares about:- Transactions – how
hledgermoves money between accounts. - Journal files – files full of transactions
- Transactions – how
- Stuff I care about:
- Rules files – how I set up accounts, import CSVs, and move money between accounts.
- Reports – help me see where my money is going and if I messed up my rules.
Transactions move money between accounts:
2024-01-01 Payday
    income:work      $-100.00
    assets:checking   $100.00
This transaction shows that on Jan 1, 2024, money moved from
income:work into assets:checking—Payday.
The sum of each transaction should be $0. Money comes from somewhere, and the same amount goes somewhere else—double-entry accounting. This is powerful technology—it makes mistakes impossible to ignore.
Journal files are text files containing one or more transactions:
2024-01-01 Payday
    income:work              $-100.00
    assets:checking           $100.00
2024-01-02 QUANSHENG UVK5
    assets:checking          $-29.34
    expenses:fun:radio        $29.34
Rules files transform CSVs into journal files via regex matching.
Here’s a CSV from my bank:
Transaction Date,Description,Category,Type,Amount,Memo
09/01/2024,DEPOSIT Paycheck,Payment,Payment,1000.00,
09/04/2024,PizzaPals Pizza,Food & Drink,Sale,-42.31,
09/03/2024,Amazon.com*XXXXXXXXY,Shopping,Sale,-35.56,
09/03/2024,OBSIDIAN.MD,Shopping,Sale,-10.00,
09/02/2024,Amazon web services,Personal,Sale,-17.89,
And here’s a checking.rules to transform that CSV into a
journal file so I can use it with hledger:
# checking.rules
# --------------
# Map CSV fields → hledger fields[0]
fields date,description,category,type,amount,memo,_
# `account1`: the account for the whole CSV.[1]
account1    assets:checking
account2    expenses:unknown
skip 1

date-format %m/%d/%Y
currency $

if %type Payment
    account2 income:unknown
if %category Food & Drink
    account2 expenses:food:dining

# [0]: <https://hledger.org/hledger.html#field-names>
# [1]: <https://hledger.org/hledger.html#account-field>
With these two files (checking.rules and
2024-09_checking.csv), I can make the CSV into a
journal:
$ > 2024-09_checking.journal \
    hledger print \
    --rules-file checking.rules \
    -f 2024-09_checking.csv
$ head 2024-09_checking.journal
2024-09-01 DEPOSIT Paycheck
    assets:checking        $1000.00
    income:unknown        $-1000.00

2024-09-02 Amazon web services
    assets:checking          $-17.89
    expenses:unknown          $17.89
Reports are interesting ways to view transactions between accounts.
There are registers, balance sheets, and income statements:
$ hledger incomestatement \
    --depth=2 \
    --file=2024-09_bank.journal

Revenues:
               $1000.00 income:unknown
-----------------------
               $1000.00


Expenses:
                 $42.31 expenses:food
                 $63.45 expenses:unknown
-----------------------
                $105.76
-----------------------
Net:            $894.24
At the beginning of September, I spent $105.76 and made
$1000, leaving me with $894.24.
But a good chunk is going to the default expense account,
expenses:unknown. I can use the
hleger aregister to see what those transactions are:
$ hledger areg expenses:unknown \
    --file=2024-09_checking.journal \
    -O csv | \
  csvcut -c description,change | \
  csvlook
| description              | change |
| ------------------------ | ------ |
| OBSIDIAN.MD              |  10.00 |
| Amazon web services      |  17.89 |
| Amazon.com*XXXXXXXXY     |  35.56 |
l
Then, I can add some more rules to my
checking.rules:
if OBSIDIAN.MD
    account2 expenses:personal:subscriptions
if Amazon web services
    account2 expenses:personal:web:hosting
if Amazon.com
    account2 expenses:personal:shopping:amazon
Now, I can reprocess my data to get a better picture of my spending:
$ > 2024-09_bank.journal \
    hledger print \
    --rules-file bank.rules \
    -f 2024-09_bank.csv
$ hledger bal expenses \
    --depth=3 \
    --percent \
    -f 2024-09_checking2.journal
              30.0 %  expenses:food:dining
              33.6 %  expenses:personal:shopping
               9.5 %  expenses:personal:subscriptions
              16.9 %  expenses:personal:web
--------------------
             100.0 %
For the Amazon.com purchase, I lumped it into the
expenses:personal:shopping account. But I could dig
deeper—download my
order history from Amazon and categorize that spending.
This is the power of working bit-by-bit—the data guides you to the next, deeper rabbit hole.
Goals and non-goals
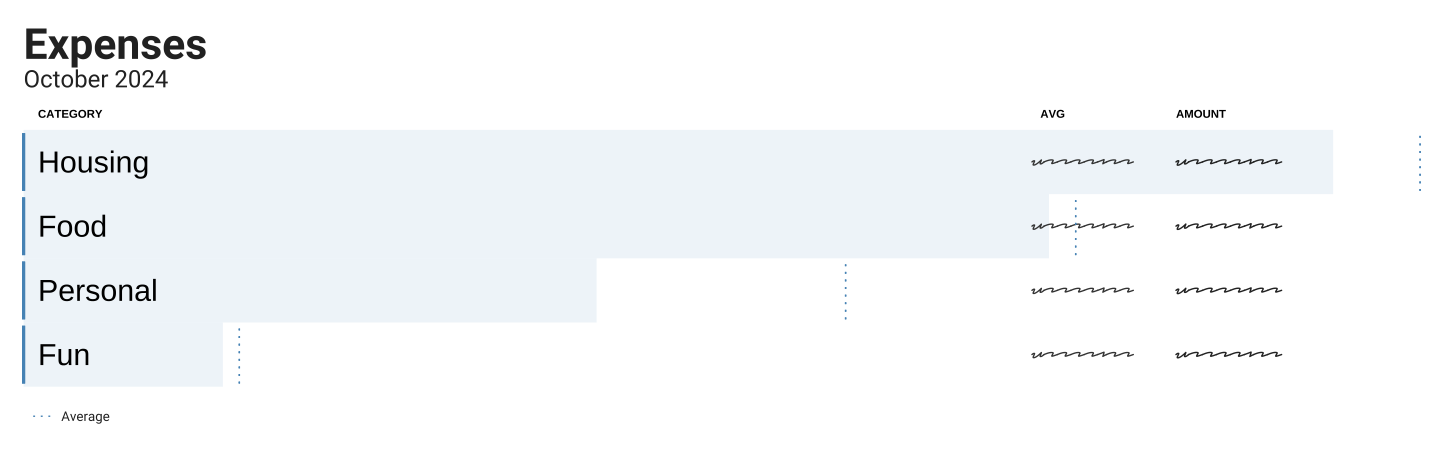
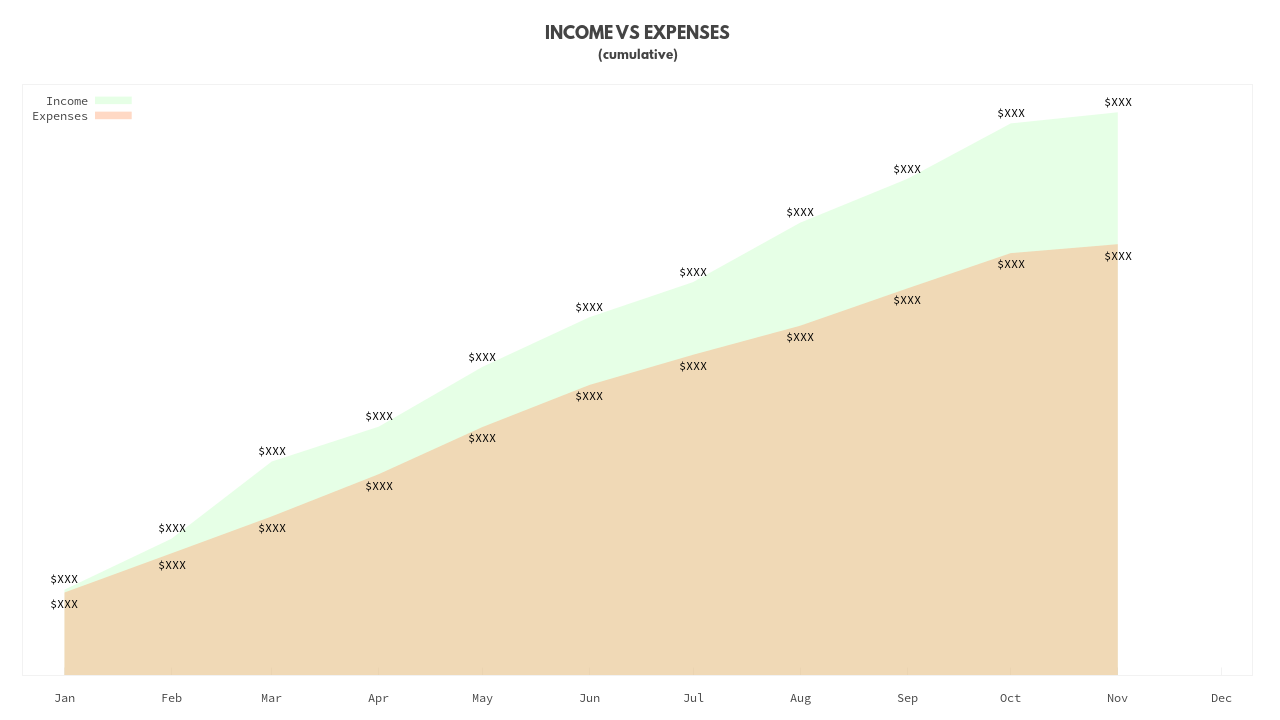
Why am I doing this? For years, I maintained a monthly spreadsheet of account balances. I had a balance sheet. But I still had questions.
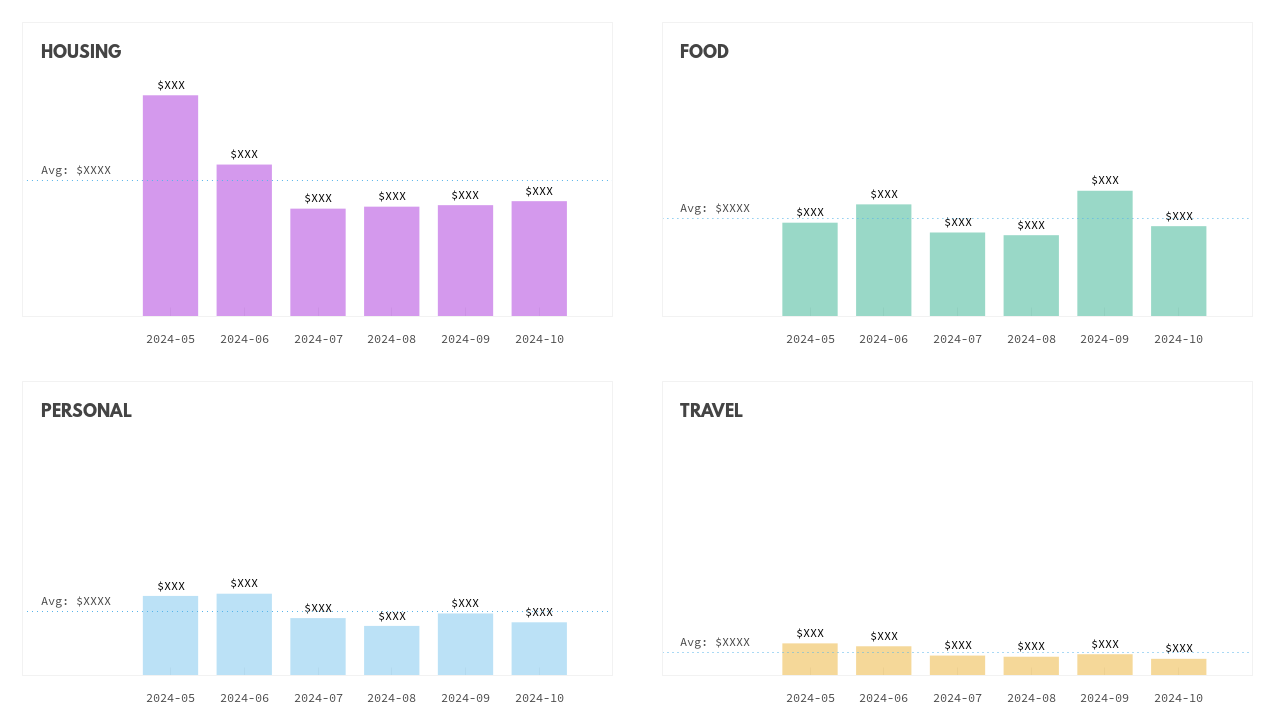
Before diving into accounting software, these were my goals:
- Granular understanding of my spending – The big one. This is where my monthly spreadsheet fell short. I knew I had money in the bank—I kept my monthly balance sheet. I budgeted up-front the % of my income I was saving. But I had no idea where my other money was going.
- Data privacy – I’m unwilling to hand the keys to my accounts to YNAB or Mint.
- Increased value over time – The more time I put in, the more value I want to get out—this is what you get from professional tools built for nerds. While I wished for low-effort setup, I wanted the tool to be able to grow to more uses over time.
Non-goals—these are the parts I never cared about:
- Investment tracking – For now, I left this out of scope. Between monthly balances in my spreadsheet and online investing tools’ ability to drill down, I was fine.2
- Taxes – Folks smarter than me help me understand my yearly taxes.3
- Shared system – I may want to share reports from this system, but no one will have to work in it except me.
- Cash – Cash transactions are unimportant to me. I withdraw money from the ATM sometimes. It evaporates.
hledger can track all these things. My setup is flexible
enough to support them someday. But that’s unimportant to me right
now.
Monthly maintenance
I spend about an hour a month checking in on my money Which frees me to spend time making fancy charts—an activity I perversely enjoy.
Here’s my setup:
$ tree ~/Documents/ledger
.
├── export
│   ├── 2024-balance-sheet.txt
│   └── 2024-income-statement.txt
├── import
│   ├── in
│   │   ├── amazon
│   │   │   └── order-history.csv
│   │   ├── credit
│   │   │   ├── 2024-01-01_2024-02-01.csv
│   │   │   ├── ...
│   │   │   └── 2024-10-01_2024-11-01.csv
│   │   └── debit
│   │       ├── 2024-01-01_2024-02-01.csv
│   │       ├── ...
│   │       └── 2024-10-01_2024-11-01.csv
│   └── journal
│       ├── amazon
│       │   └── order-history.journal
│       ├── credit
│       │   ├── 2024-01-01_2024-02-01.journal
│       │   ├── ...
│       │   └── 2024-10-01_2024-11-01.journal
│       └── debit
│           ├── 2024-01-01_2024-02-01.journal
│           ├── ...
│           └── 2024-10-01_2024-11-01.journal
├── rules
│   ├── amazon
│   │   └── journal.rules
│   ├── credit
│   │   └── journal.rules
│   ├── debit
│   │   └── journal.rules
│   └── common.rules
├── 2024.journal
├── Makefile
└── README
Process:
- Import – download a CSV for the month from each
account and plop it into
import/in/<account>/<dates>.csv - Make – run
make - Squint – Look at
git diff; if it looks good,git add . && git commit -m "💸"otherwise reviewhledger aregto see details.
The Makefile generates everything under
import/journal:
- journal files from my CSVs using their corresponding rules.
- reports in the
exportfolder
I include all the journal files in the 2024.journal with
the line: include ./import/journal/*/*.journal
Here’s the Makefile:
SHELL := /bin/bash
RAW_CSV = $(wildcard import/in/**/*.csv)
JOURNALS = $(foreach file,$(RAW_CSV),$(subst /in/,/journal/,$(patsubst %.csv,%.journal,$(file))))

.PHONY: all
all: $(JOURNALS)
    hledger is -f 2024.journal > export/2024-income-statement.txt
    hledger bs -f 2024.journal > export/2024-balance-sheet.txt

.PHONY clean
clean:
        rm -rf import/journal/**/*.journal

import/journal/%.journal: import/in/%.csv
    @echo "Processing csv $< to $@"
    @echo "---"
    @mkdir -p $(shell dirname $@)
    @hledger print --rules-file rules/$(shell basename $$(dirname $<))/journal.rules -f "$<" > "$@"
If I find anything amiss (e.g., if my balances are different than
what the bank tells me), I look at hleger areg. I may tweak
my rules or my CSVs and then I run
make clean && make and try again.
Simple, plain text accounting made simple.
And if I ever want to dig deeper, hledger’s docs have more to
teach. But for now, the balance of effort vs. reward is perfect.
while reading a blog post from Jonathan Dowland↩︎
Note, this is covered by full-fledged hledger – Investements↩︎
Also covered in full-fledged hledger – Tax returns↩︎
We’ve all seen Git commit hashes—the hard-to-remember hexadecimal strings that refer to Git commits.
But it’s rare to see Git commit hashes spark joy:
$ git log --oneline
deadbeef (HEAD -> main) Dead beef is beef. Live beef is cow. 🥁
c0ffeeee Late night debugging ☕
defacedd Fix vandalism
facade00 Provide simple interface class
c0deca11 Add function call
Creating memorable Git hashes is hard. Git creates hashes with SHA-1 or SHA-2, which are one-way functions—there’s no way to predict a hash.
So, to spread joy with Git history, we need to:
- Brute-force funny Git commit hashes.
- Keep Git usable – Git commit messages and metadata should stay usable by humans and machines.
- Be fast – I need to find commit hashes quickly, without churning forever for a bit of silly fun.
What can I spell with a git commit?

With hexadecimal we can spell any word containing the set of letters
{A, B, C, D, E, F}—DEADBEEF (a classic) or
ABBABABE (for Mama Mia aficionados).
This is because hexadecimal is a base-16 numbering system—a single “digit” represents 16 numbers:
Base-10: 0  1  2  3  4  5  6  7  8  9 10 11 12 13 16 15
Base-16: 0  1  2  3  4  5  6  7  8  9  a  b  c  d  e  f
Git hashes use lowercase letters and the numbers 0–9. Some numbers
look like lowercase letters, which expands our palette of
words—substituting 0 for O, 1 for
l, and 5 for s.
I created a script that scours word lists for valid words and phrases.
With my script, I found some masterpieces: dadb0d (dad
bod), bada55 (bad ass), 0ff1oad (offload),
0ddba11 (oddball), and the famous last words:
fee155afe (feels safe).
What is a Git commit hash?
Git commit hashes are no mystery.
A Git commit object is a compressed file that looks like:
$ < .git/objects/b8/da4201321b5d73297c353a36e09492d6abcdf2 zlib-flate -uncompress | cat -v
commit 195^@tree 66dd8a515582fba80ca1e1137a6763f3759ebd65
author Tyler Cipriani <REDACTED> 1760808267 -0600
committer Tyler Cipriani <REDACTED> 1760812806 -0600

Initial commit
Decompressing a Git commit object using
zlib-flate -uncompress gives you the complete formatted
commit object. Commit objects use the format:
commit [Length of commit message in bytes]\0[Commit message]`The commit message includes:
- Pointers to other Git objects (parent commits, trees, or other commits)
- Author name, email, author time
- Committer name, email, commit time
- The commit message
Git stores commits as zlib-compressed files under
.git/objects1. Each filename is the SHA-1 (or
SHA-2) of the object’s decompressed contents:
$ < .git/objects/b8/da4201321b5d73297c353a36e09492d6abcdf2 zlib-flate -uncompress | sha1sum
b8da4201321b5d73297c353a36e09492d6abcdf2  -
Recreate a Git commit hash with Bash
Before I can make funny Git commit hashes, I need generate valid ones.
$ mkdir /tmp/git-repo && cd /tmp/git-repo
$ git init
Initialized empty Git repository in /tmp/git-repo/.git/
$ echo > README.md && git add README.md && git commit -m 'Initial commit'
[main (root-commit) 68ec0dd] Initial commit
 1 file changed, 1 insertion(+)
  create mode 100644 README.md
$ git log --oneline
68ec0dd (HEAD -> main) Initial commit
I created a Git repo with an empty README.md and one
commit. The commit’s hash is 68ec0dd.
$ git cat-file -p 68ec0dd > commit-msg
$ COMMIT_SIZE_BYTES="$(wc -c < commit-msg)"
$ printf 'commit %d\0' "$COMMIT_SIZE_BYTES" | \
    cat - commit-msg | \
    sha1sum
68ec0dd6dead532f18082b72beeb73bd828ee8fc  -
Here I recreate the commit hash 68ec0dd.
git cat-file– get the commit messagewc -c– get the commit message length in bytesprintf 'commit %d\0%s'– print a formatted Git commit object, complete with the commit message and lengthsha1sum– get the hash of the commit object
Brute-forcing Git commit hashes, naïve attempt
My initial modest goal is:
- Make a commit with a hash that starts
00. - Leave our code, author, and committer untouched.
- Keep the commit message the same, at least for humans.
To change the hash, I’ll need to change the hash input—the commit message. Modifying a commit message invisibly to users will be tricky.
Git pretty-prints commit messages when you run git log.
Pretty printing trims any trailing isspace()
characters:
- SPACE -
\u0020 - TAB -
\u0009
No one will see trailing spaces, but trailing spaces will change the commit hash.
To brute-force a Git commit hash, I’ll tweak the commit message in a
loop, adding a random combination of space and tab characters until the
commit hash starts with 00:
#!/usr/bin/env bash
# git-hash-fiddler.sh
# ~~~~~~~~~~~~~~~~~~~
git cat-file -p HEAD > commit-msg
CALC_HASH() {
    COMMIT_SIZE_BYTES="$(wc -c < commit-msg)"
    printf 'commit %d\0' "$COMMIT_SIZE_BYTES" | \
        cat - commit-msg | \
        sha1sum | awk '{print $1}'
}
CURRENT_HASH=$(CALC_HASH)
SPACE_CHARS=$'\u0020\u0009'

# Check if the commit hash starts with 00
while [[ ! "$CURRENT_HASH" =~ ^00 ]]; do
    grep -o . <<< "$SPACE_CHARS" | shuf -n1 >> commit-msg
    CURRENT_HASH=$(CALC_HASH)
done

# Add the modified commit to the git object store
< commit-msg git hash-object -w -t commit --stdin

# Update the current commit
git update-ref HEAD "$CURRENT_HASH"
First, I get the current commit. Then, in the while
loop, I append a random space character to the commit and compute the
hash until the hash starts with 00.
Once I find a commit that has a hash starting 00, I use
git hash-object to create a new Git commit object. Finally,
I call git update-ref to point HEAD to my new
commit hash.
$ git log --oneline
68ec0dd (HEAD -> main) Initial commit
$ time bash git-fiddler.sh
00ba5924057452af287a2be151061f973862b811

real    0m2.618s
user    0m3.130s
sys     0m1.430s
$ git log --oneline -1
00ba592 (HEAD -> main) Initial commit
It took about two seconds to brute-force a Git commit hash starting
with 00.
Not bad.
Let’s go big. Let’s try for five leading 0s:
$ time bash git-fiddler.sh
00000a2195aa3d9e85bc5b70e70807e23f2f64fb

real    118m37.577s
user    133m54.613s
sys     72m51.337s
Finding a commit hash starting with 00000 took
two hours with my silly Bash script.
I may need to optimize.
Brute-forcing Git commit hashes (before the heat death of the universe)
Fortunately, user not-an-aardvark created a tool for
that—lucky-commit.
lucky_commit does the same thing as our Bash script; it
adds combinations of TAB and SPACE characters
until it finds the Git hash with a prefix you specify.
But, unlike my Bash script, it’s fast:
$ time lucky_commit 00000

real    0m0.103s
user    0m0.323s
sys     0m0.037s
$ git log --oneline -1
00000e9 (HEAD -> main) Initial commit
Finding a Git commit hash starting with 00000 takes
100ms (as opposed to two hours with my Bash
script).
lucky_commit speeds up Git commit hashes in two
ways:
- Does less work – Both SHA-1 and SHA-2 break commit
messages in 64-byte chunks and then perform operations on those chunks
one at a time. Each chunk affects subsequent chunks. By pre-computing
the hash state before appending a fixed-length amount of padding,
lucky_commitdoes a fraction of the bit twiddling of our shell script. - Uses more CPU – Adding a fixed-length (48-bit)
amount of padding to a commit using only two characters
(
TABandSPACE), you have 248 variations (281 trillion possibilities). And you can split hashing into threads, doing more work in parallel. - Moves to the GPU – If you have a GPU, you can do
even more hashing operations in parallel. This is an option in
lucky_commit.
Use Git hooks to spread joy
All that’s left to do is to make all my commits bada55
by abusing Git hooks.
$ cat > .git/hooks/post-commit && chmod +x .git/hooks/post-commit
#!/usr/bin/env bash
WORDS=(
    babb1e    # BABBLE
    bada55    # BADASS
    badc0de   # BADCODE: not even sorry.
    c0ffee    # COFFEE
    0ddba11   # ODDBALL
    5adface   # 😿
)
lucky_commit "${WORDS[RANDOM%${#WORDS[*]}]}"
printf '✨ %s ✨\n' "$(git log --one line -1)"
With the post-commit hook above, after I commit,
lucky_commit fiddles with my commit message until my commit
hash is a random prefix from the list.
Fast, automated Git joy:
$ git commit --amend --no-edit
✨ 0ddba116 Initial commit ✨
[main bd256a9] Initial commit
 Date: Mon Oct 20 17:58:32 2025 -0600
 1 file changed, 1 insertion(+)
 create mode 100644 README.md
$ git commit --amend --no-edit
✨ badc0de9 Initial commit ✨
[main facd923] Initial commit
 Date: Mon Oct 20 17:58:32 2025 -0600
 1 file changed, 1 insertion(+)
 create mode 100644 README.md
$ git commit --amend --no-edit
✨ babb1e6 Initial commit ✨
[main 441ec61] Initial commit
 Date: Mon Oct 20 17:58:32 2025 -0600
 1 file changed, 1 insertion(+)
 create mode 100644 README.md
Git also stores compressed objects under
.git/objects/pack, but most objects start their lives as loose files.↩︎