To see posts by date, check out the
archives
My work laptop is terrible. About a year and a half ago, when I
started my current gig, I received an Asus Zenbook that has been the
bane of my existence ever since. First, it is impossible to work outside
on this shiny monstrosity: all you see is your own dumb face squinting
back at you, slightly obscured by very noticeable fingerprints from its
mirror-like screen. Why are there fingerprints on the screen? Because,
oh yeah, it’s a terrible touchscreen for no real reason. While the
keyboard is serviceable, it is far from being a joy to use. There are no
physical mouse buttons which, on a Linux install, means I’m forever
flailing, trying to get middle-click paste to work (LPT: I setup an
The final straw for this ridiculous machine was, for a reason that is
beyond me, UEFI occasionally loses track of the boot drives and
(although you can still see(!) the I have been using a ThinkPad X230t for the past 3 years, and,
although the tablet is a little bulky, it has been everything I need in
a work laptop – matte screen, physical buttons for all the things, an
Ethernet port – it’s basically not an unbelievably stupid
laptop design (which is the bar now, evidently). The X220 I purchased
for work is even better – it’s slightly smaller (since it’s not also a
Wacom tablet), plus the X220 has a nice keyboard – which – holy
shit! – remember when anyone actually cared about laptop keyboards‽ One of the other reasons for buying the X220 is that I’ve heard-tell
(A.K.A, did a quick DDG search) that it supports Coreboot (although,
sadly, not Libreboot, yet). The actual incantations for flashing the ROM
on the X220 are spread over a few sources, with some sizable gaps in
process. I spent the past 2 days pretty lost, flailing in the dark, booting my
freshly flashed laptop to a momentary flicker of the green power-light,
no fans, nothing, sighing, and compiling again. Now I stand victorious,
Debian stable (8.6 as of November 2016) is booting from SeaBIOS. I kept a lot of notes on the process. Hopefully, these notes save
someone some frustration, or make this process a tiny bit more
approachable. Caveat Emptor – I’m terrible at hardware stuff and
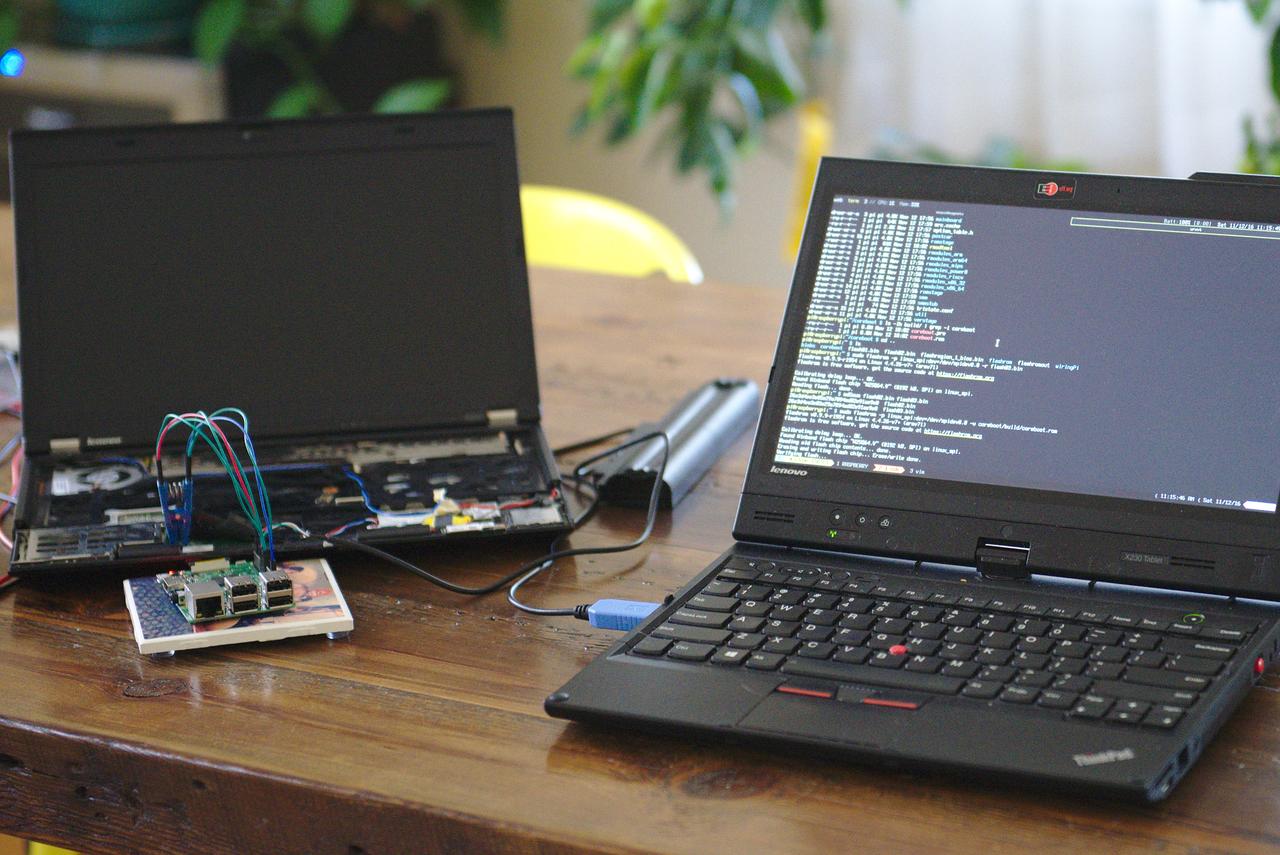
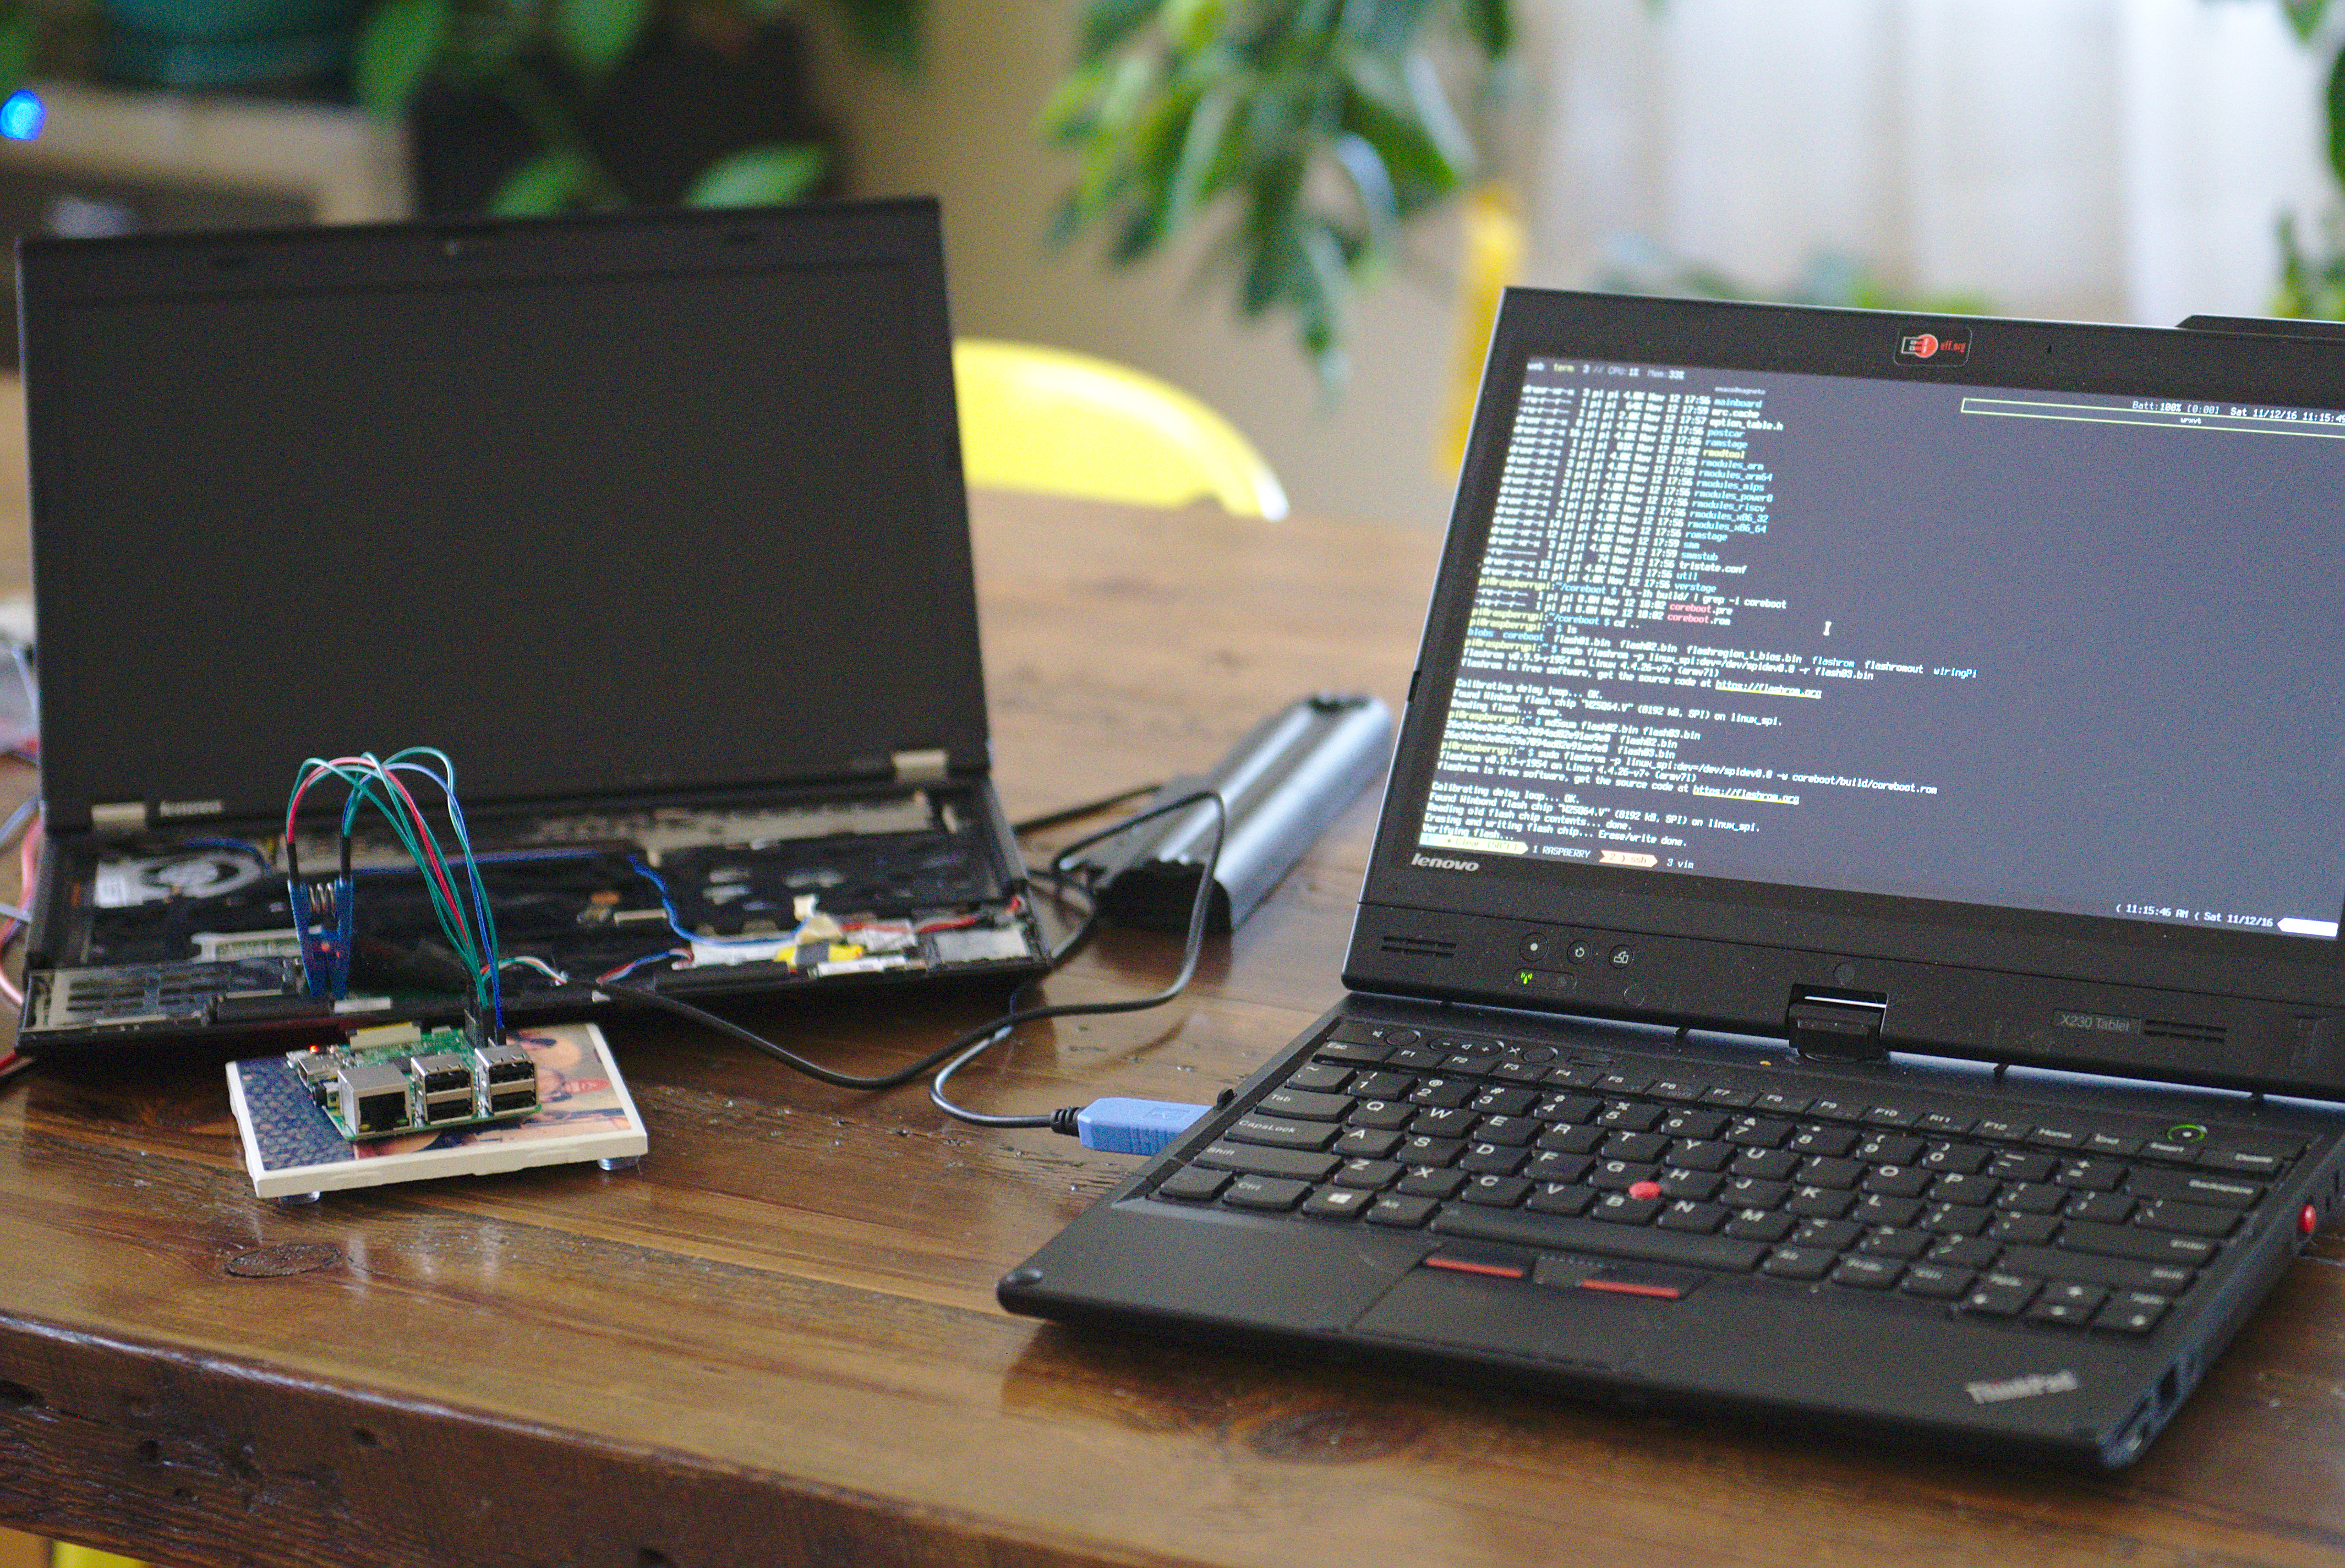
writing, so follow these steps at your own peril! Now that you have access to the BIOS chip, you should setup your
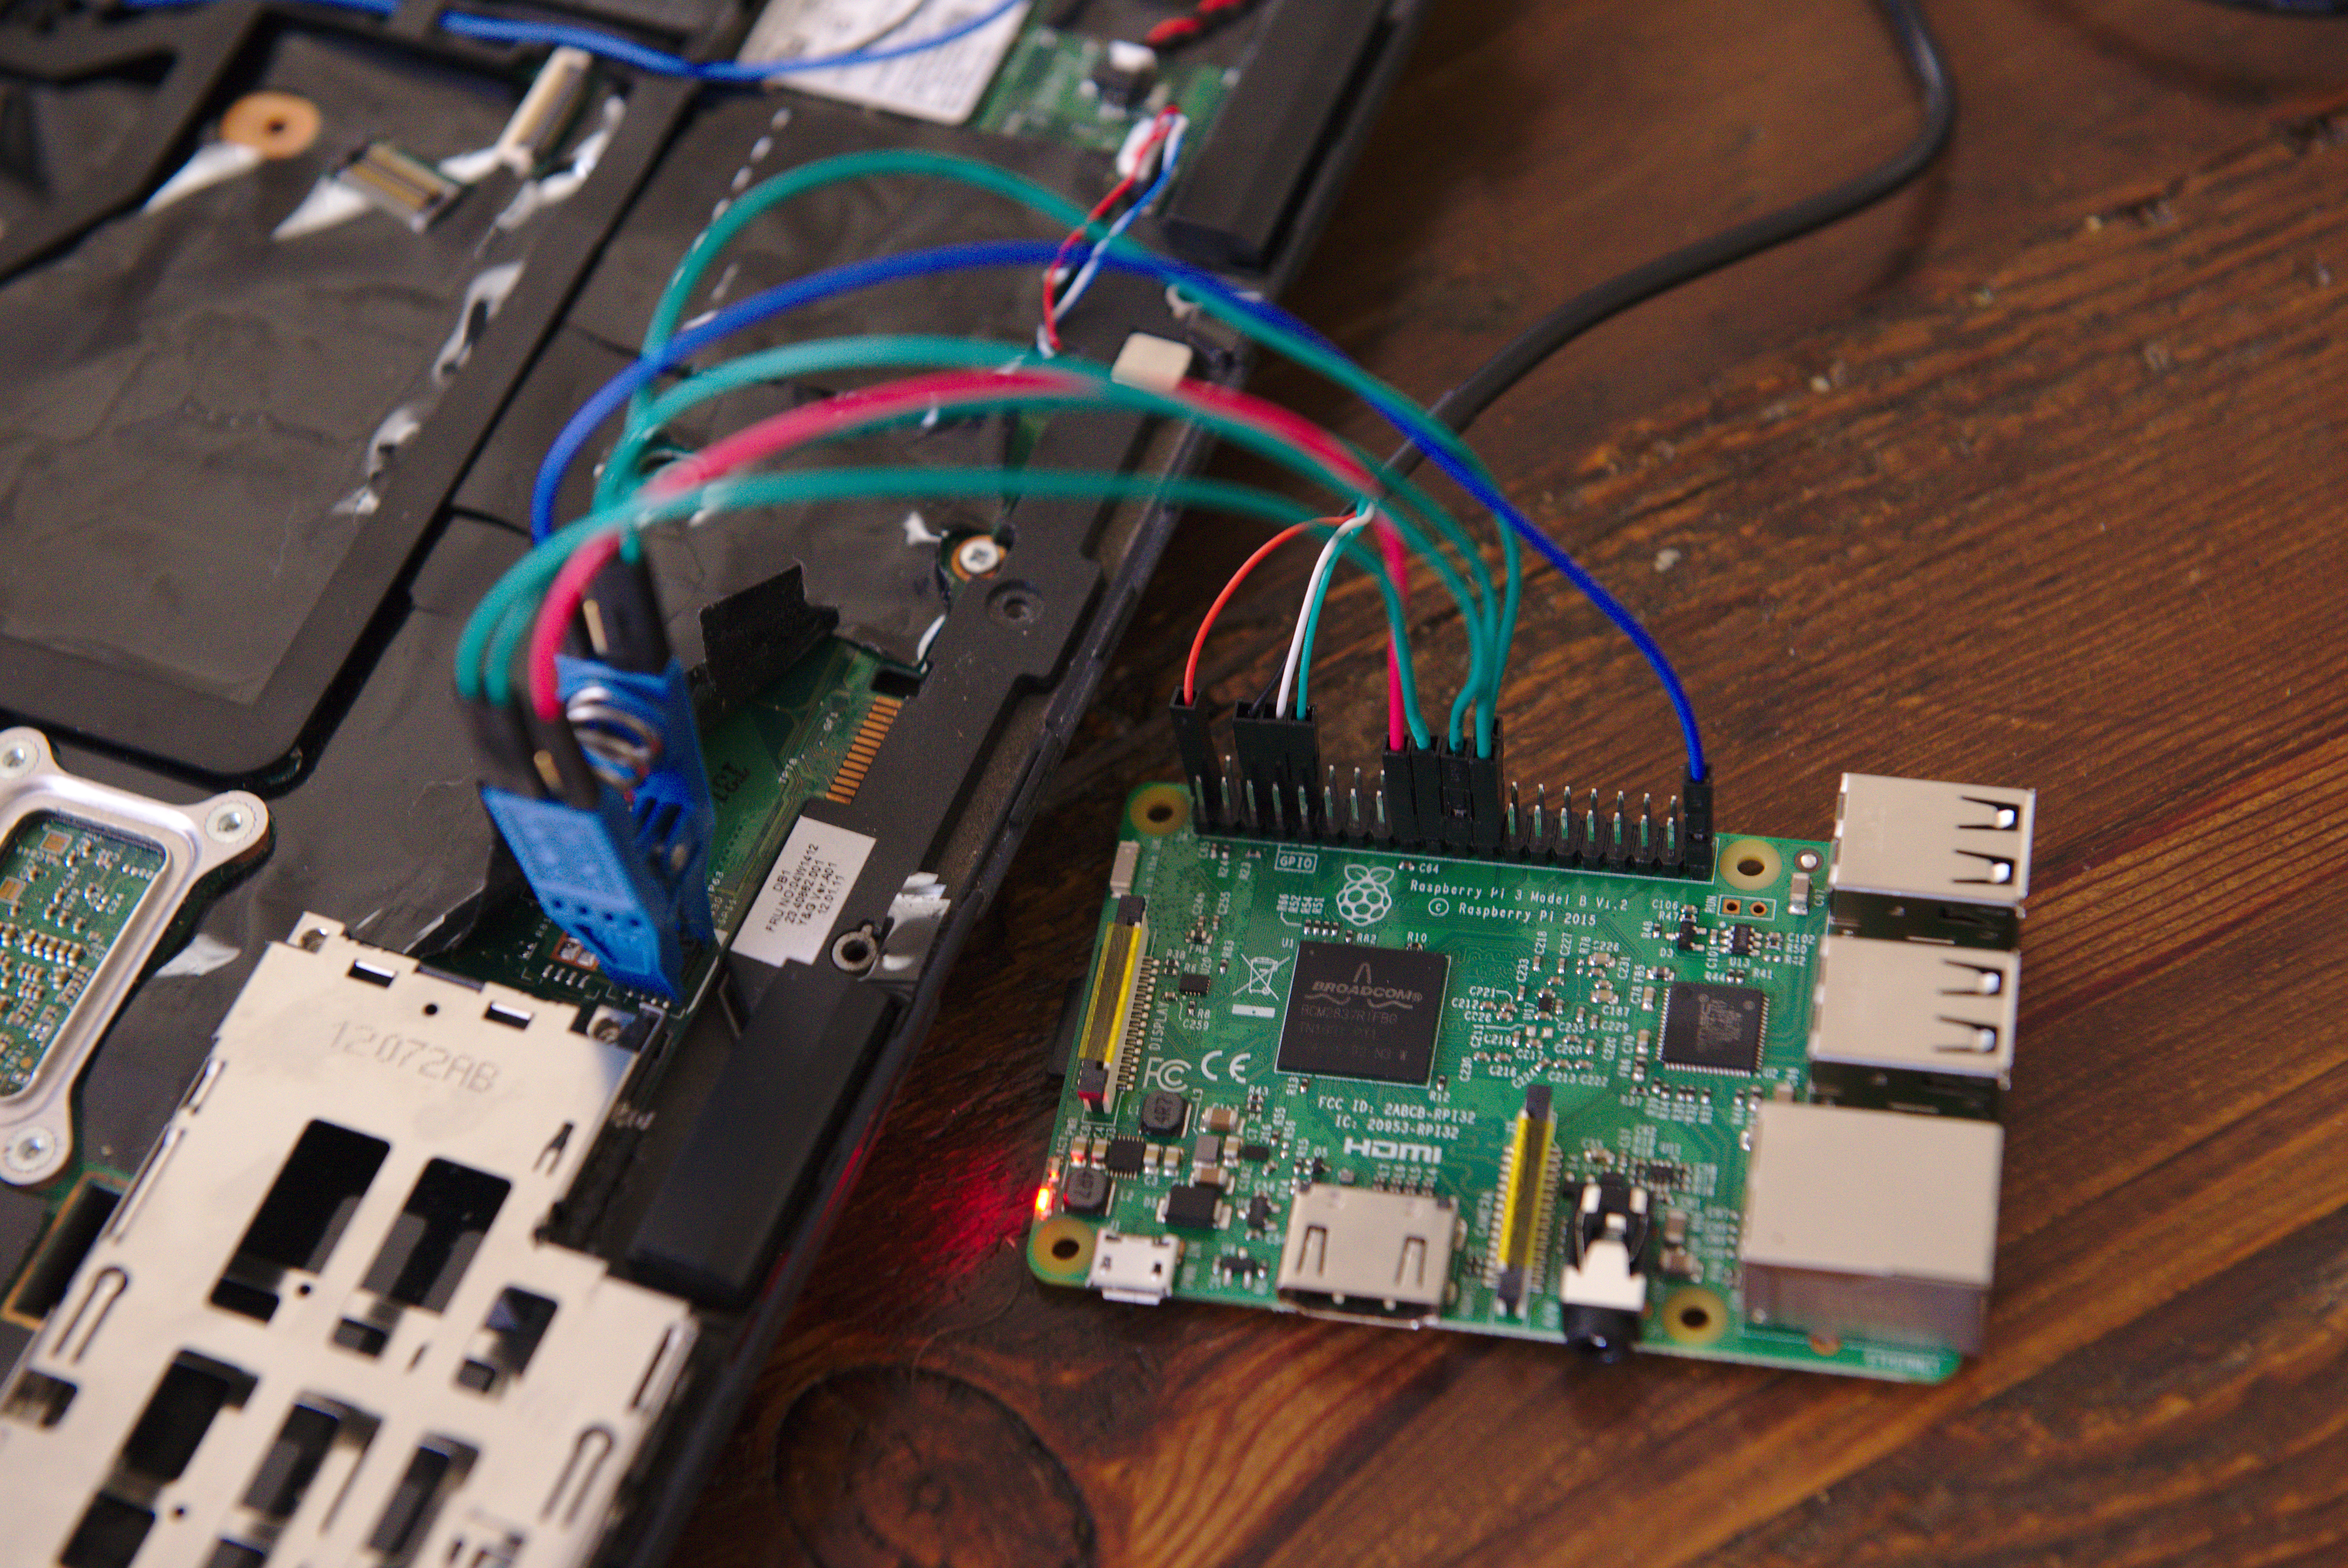
Raspberry Pi, and attach it to the Pomona 5250 clip via the SPI pins.
Unfortunately, you do seem to need a monitor with HDMI to setup the Pi
(someone better at Raspberry Pi things may know better). After the initial setup I was able to switch to using a serial cable
interface. GIANT HUGE WARNING OF DOOM: Hook your Pomona clip to
your motherboard ONLY WITH THE BATTERY REMOVED, THE X220
UNPLUGGED, AAAANNDDD THE RASPBERRY PI OFF!!!! You could
probably fry this chip. I don’t actually know, but I was paranoid about
it throughout the process. Power on the Raspberry Pi only when you’re
certain the Pomona clip is secure. Download the Raspbian Lite
torrent Unzip the rasbian zip file and copy to an sd card Hook up your Raspberry Pi to a monitor and boot Change password using Setup wifi by editing
Edit Now you can reboot and hook to a serial cable: Serial cable hookup diagram: Install all the pre-req software working mostly from github wiki
page Hardware
Flashing with Raspberry Pi Add the SPI kernal modules to Power down the Pi, Hook your Pi to your Pomona clip, then hook
the Pomona clip to the motherboard, and power back up. X220 BIOS Chip pinout PI Pinout WARNING!!! This is the pinout for the
RASPBERRY PI 3 MODEL B V1.2 it has 40 pins rather than
26 See if NOTE: 2018-04-06 One person emailed to indicate that the flashrom commands below
required setting an Read your flashchip and verify that the md5sums match. If the
md5sums of your reads don’t match repeat steps 9 and 10 until they do.
If they never do, check your wiring with a multimeter (I had to do this
at one point). Download coreboot on the Pi. Compile and use NOTE: 2017-06-15 Thomas Maulbeck emailed me and mentioned that
Maulbeck was able to work around compilation errors by cloning
If compilation fails with some mention of a missing
Build coreboot on the Pi following the wiki
instructions NOTE: 2018-04-06 One person emailed to mention that EDIT – 2016-11-27 Andreas Sinninger pointed out I
was missing the path to the Intel ME/TXE firmware – corrected. FINALLY! Flash your new If your laptop boots up to a SeaBIOS screen at this point: you win!
If not, don’t despair, you can flash These are some general resources without which my X220 would be a
pathetic pile of smashed up silicon by now.xdotool shortcut to paste – doesn’t work in Emacs though…).
The Asus has also succumb to the Apple-esque use of dongles to replace
all necessary ports (like Ethernet, FFS)..efi file on
disk via the UEFI interface) it won’t let you add it as a boot drive
until you’ve sweated enough and/or there is a sufficiently powerful
cosmic ray to flip the bits necessary to allow you to continue your
life. This problem pretty much killed my productivity at my last offsite
– as a result I decided to drop $500 and get a refurb ThinkPad X220 with
more RAM and a bigger SSD than the ($1800) Zenbook.X-Series ThinkPads are niiiiice
I am become hacker, destroyer of laptops
Things you need
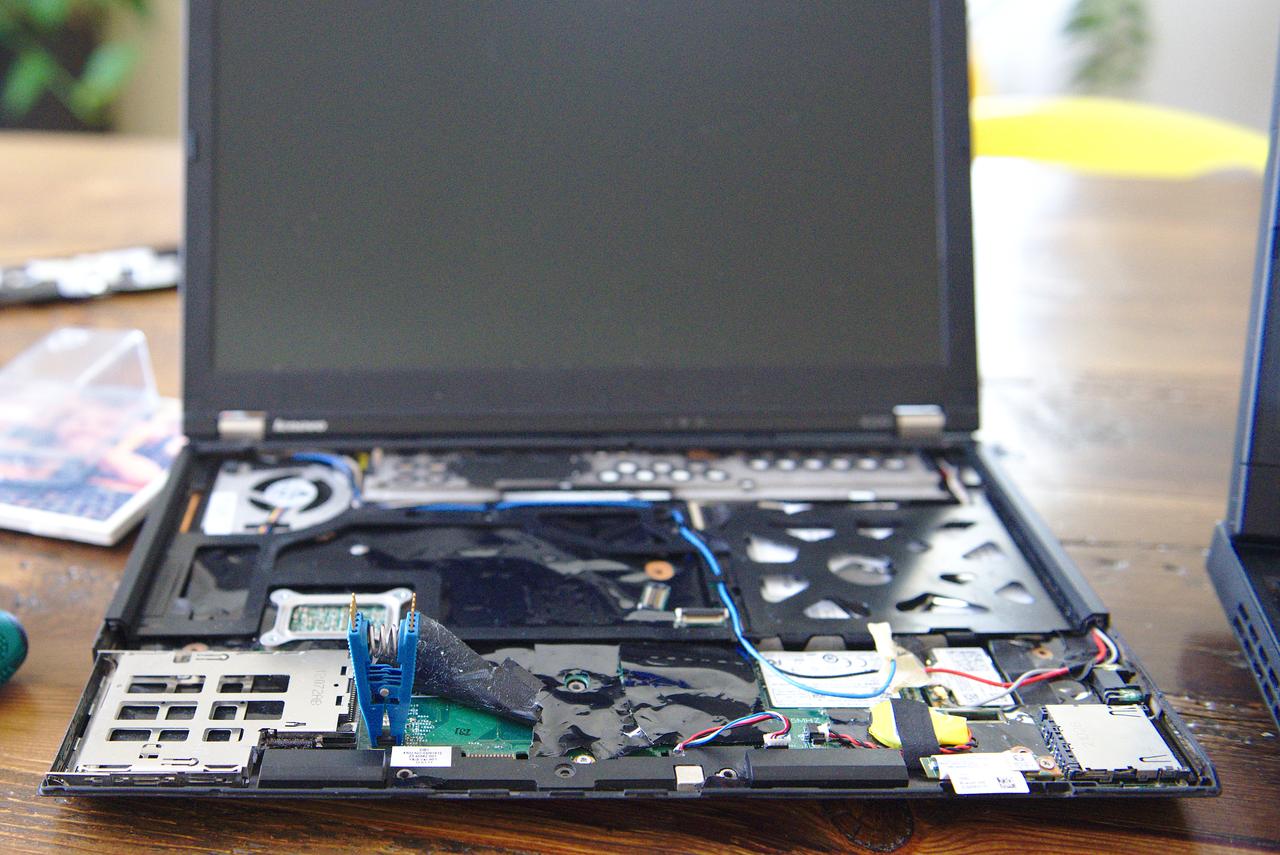
ThinkPad X220 Disassembly
    Bottom of the ThinkPad -- 'X' marks screws to be removed
   +-----------------------------------------------------------+
   |   xxxxxxxxxxxx Battery xxxxxxxxxxxxxxxxxxxxxxxxx          |
   |   xxxxxxxxxxxxx Area xxxxxxxxxxxxxxxxxxxxxxxxxxx          |
   |                                                           |
   |                                                           |
   |                                                           |
   |              +----X----------------+                      |
   |              |                     |                      |
   |              |      Memory         |                      |
   |              |       Door          |                      |
   |   X          |        X            |             X        |
   |      X       +---------------------+                      |
   |                  X               X                        |
   +-----------------------------------------------------------+
Setup Your Pi as a Flasher
dd bs=4M if=rasbian-lite.img of=/dev/<partition of sd card>passwd (default user/pass:
pi/raspberry)/etc/wpa_supplicant/wpa_supplicant.confnetwork={
ssid="YOUR_SSID"
psk="YOUR_PASSWORD"
}/boot/config.txtdtparam=spi=on
enable_uart=1 Edge of pi (furthest from you)
L PWR GND TXD RXD
E | | | |
F +----v---------v----v----v-------------------------------------------------------------------------------+
T | x x x x x x x x x x x x x x x x x x x x |
| x x x x x x x x x x x x x x x x x x x x |
E +--------------------------------------------------------------------------------------------------------+
D
G
E
Body of Pi (closest to you)sudo apt-get update && sudo apt-get dist-upgrade && sudo reboot
sudo apt-get update && sudo apt-get install libftdi1 libftdi-dev libusb-dev libpci-dev subversion
sudo apt-get install build-essential pciutils usbutils libpci-dev libusb-dev libftdi1 libftdi-dev zlib1g-dev subversion
svn co svn://flashrom.org/flashrom/trunk flashrom
cd flashrom
make
sudo make install/etc/modules so they
persist between boots.sudo modprobe spi_bcm2835
sudo modprobe spidev
 Screen (furthest from you)
             __
  MOSI  5 --|  |-- 4  GND
   CLK  6 --|  |-- 3  N/C
   N/C  7 --|  |-- 2  MISO
   VCC  8 --|__|-- 1  CS

Edge (closest to you) Edge of pi (furthest from you)
L CS
E |
F +--------------------------------------------------------------------------------------------------------+
T | x x x x x x x x x x x x x x x x x x x x |
| x x x x x x x x x x x x x x x x x x x x |
E +--------------------------------------------^----^----^----^---------------------------------------^----+
D | | | | |
G 3.3V MOSI MISO | GND
E (VCC) CLK
Body of Pi (closest to you)flashrom can detect your chipset (if you see
No EEPROM/flash device found. double check your connections
and the pins for your pi – I realized I had my pins setup as if I were
on the 26-GPIO pin Raspberry Pi rather than the 40-GPIO pin model 3)
spispeed, i.e.,
sudo flashrom -p linux_spi:dev=/dev/spidev0.0,spispeed=512pi@raspberrypi:~$ sudo flashrom -p linux_spi:dev=/dev/spidev0.0
flashrom v0.9.9-r1954 on Linux 4.4.26-v7+ (armv7l)
flashrom is free software, get the source code at https://flashrom.org
Calibrating delay loop... OK.
Found Winbond flash chip "W25Q64.V" (8192 kB, SPI) on linux_spi.
No operations were specified.pi@raspberrypi:~$ sudo flashrom -p linux_spi:dev=/dev/spidev0.0 -r flash01.bin
pi@raspberrypi:~$ sudo flashrom -p linux_spi:dev=/dev/spidev0.0 -r flash02.bin
pi@raspberrypi:~$ md5sum flash01.bin flash02.binifdtool
to extract all the needed bits to all the right places in the coreboot
blobs directory.git clone http://review.coreboot.org/coreboot.git ~/coreboot
cd ~/coreboot
git submodule update --init --recursive
cd ~/coreboot/util/ifdtool
make
sudo make install
cd ~
ifdtool -x ~/flash01.bin
mkdir -p ~/coreboot/3rdparty/blobs/mainboard/lenovo/x220
cd ~/coreboot/3rdparty/blobs/mainboard/lenovo/x220
mv ~/flashregion_0_flashdescriptor.bin descriptor.bin
mv ~/flashregion_2_intel_me.bin me.bin
mv ~/flashregion_3_gbe.bin gbe.bin
git submodule update --init --recursive did not populate
the 3rdparty/blobs directory. It seems that
.gitmodules for coreboot has several urls that look in the
parent directory for bare git repositories that don’t exist in the setup
I’ve described in this post.3rdparty/blobs directly:cd ~/coreboot/3rdparty
git clone http://review.coreboot.org/p/blobs.git3rdparty/blobs/cpu/intel/model_206ax/microcode.bin this may
be the root cause.
make nconfiggeneral
- [*] Compress ramstage with LZMA
- [*] Include coreboot .config file into the ROM image
- [*] Allow use of binary-only repository
mainboard
- Mainboard vendor (Lenovo)
- Mainboard model (ThinkPad X220)
- ROM chip size (8192 KB (8 MB))
- (0x100000) Size of CBFS filesystem in ROM
chipset
- [*] Enable VMX for virtualization
- Include CPU microcode in CBFS (Generate from tree)
- Flash ROM locking on S3 resume (Don't lock ROM sections on S3 resume)
- [*] Add Intel descriptor.bin file
(3rdparty/blobs/mainboard/$(MAINBOARDDIR)/descriptor.bin) Path and filename of the descriptor.bin file
- [*] Add Intel ME/TXE firmware
(3rdparty/blobs/mainboard/$(MAINBOARDDIR)/me.bin) Path to management engine firmware
- [*] Add gigabit ethernet firmware
(3rdparty/blobs/mainboard/$(MAINBOARDDIR)/gbe.bin) Path to gigabit ethernet firmware
devices
- [*] Use native graphics initialization
display
- (nothing checked)
generic drivers
- [*] Support Intel PCI-e WiFi adapters
- [*] PS/2 keyboard init
console
- [*] Squelch AP CPUs from early console.
[*] Show POST codes on the debug console
system tables
- [*] Generate SMBIOS tables
payload
- Add a payload (SeaBIOS)
- SeaBIOS version (master)
- (3000) PS/2 keyboard controller initialization timeout (milliseconds)
- [*] Harware init during option ROM execution
- [*] Include generated option rom that implements legacy VGA BIOS compatibility
- [*] Use LZMA compression for payloads
debugging
- (nothing checked)
make nconfig may
require a number of dependencies, see the coreboot wiki for
a complete list. As of this writing that list reads:
apt-get install git build-essential gnat flex bison libncurses5-dev wget zlib1g-dev
make crossgcc-i386 CPUS=4
make iasl
make
coreboot.rom to your rom
chip:
{.bash} pi@raspberrypi:~$ sudo flashrom -p linux_spi:dev=/dev/spidev0.0 -r flash01.bin pi@raspberrypi:~$ sudo flashrom -p linux_spi:dev=/dev/spidev0.0 -r flash02.bin pi@raspberrypi:~$ md5sum flash01.bin flash02.bin # if these don't match, stop, turn off the pi, fiddle with the Pomona clip, repeat this step pi@raspberrypi:~$ sudo flashrom -p linux_spi:dev=/dev/spidev0.0 -w ~/coreboot/build/coreboot.romflash01.bin to go back
to your old BIOS, or, better yet, keep compiling until it works.Resources
Posted